Print Taking - Using the Supplied Ink Strips
After listening to Thumbies® purchasers who consistently create high quality fingerprints using the supplied ink strips, we have found similarities in how they prep and take the prints. It is these tips and tricks that we would like to pass on to you.
- The best quality prints are taken pre-embalming—within 12 hours of receiving the body.
- The quality of the finished Thumbies keepsake is directly related to the quality of the fingerprint taken.
The following steps are suggested as a successful method to take a good fingerprint using the Thumbies Fingerprint Scanner™.
Step 1: Start by looking at the digit.
The thumb or finger may carry debris, oils and/or moisture. Prior to inking, the digit should be cleaned and dried. After cleaning, look at the area between nail tip and first knuckle to locate any unique whorls, swirls or arches (we call this area the ‘sweet spot’). These unique identifiers make the most interesting keepsakes and are the areas to target.
Step 2: : Inking the finger.
The most effective method of applying ink to a finger is to first attach the ink strip onto a firm surface, like a clipboard. Bring the clipboard with the attached strip to the digit. Using ONLY a TAPPING motion, cover the ‘sweet spot’ with ink. Do not smear the ink onto the digit because the ink will fill the spaces between ridges and reduce the quality of the finished print.
Step 3: Get the print onto the card.
Attach the order card to the firm surface so that the available area for print taking is face up. Bring the card to the digit and TAP the digit onto the card surface. DO NOT ROLL the digit, just TAP. After the first print is on the card, move the card to make available a non-inked area and TAP the digit again. Continue this process until a good print is acquired. This may require re-inking. Never use lined paper for print-taking and DO NOT ROLL the digit. This may work on CSI but not for this purpose.
Step 4: Examine the prints that you've taken.
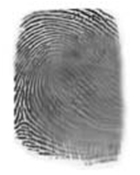
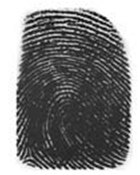
Review the prints taken before you clean off the ink from the digit. A good print shows clear ridges and good contrast. View the examples of prints below. Remember, if you don’t see detail in the prints, reprint. The quality of the keepsake is tied to the quality of the print.
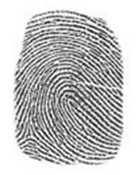
Good Print

Light Print
Smudged Print
Moist Print