Taking Hand, Foot, or Fingerprints with an Index Card
If you do not already have a print to submit with your order, follow this guidance on how to take one. The quality of the finished Thumbies® keepsake is directly related to the quality of the print you provide. The following steps are an effective method to take a good hand/foot/fingerprint. These instructions work best with a soy-based ink pad.
Step 1: Start by looking at the digit, hand, or foot.
The thumb, finger, hand, or foot may carry debris, oils, and/or moisture. Prior to inking, the body part should be cleaned and dried.
For fingerprints, look at the area between nail tip and first knuckle to locate any unique whorls, swirls, or arches (we call this area the ‘sweet spot’). These unique identifiers make the most interesting keepsakes and are the areas to target.
For hand and foot prints, the character comes in the shape. Place fingers evenly-spaced for the best look.
Step 2: Apply ink to the body part.
The most effective method of applying ink to a finger is to first attach the ink strip onto a firm surface, like a clipboard. Bring the clipboard with the attached strip, or your ink pad, to the digit. Using ONLY a TAPPING motion, cover the ‘sweet spot’ with ink. Do not smear the ink onto the digit because the ink will fill the spaces between ridges and reduce the quality of the finished print.
For a foot or hand, assuming you have an ink pad large enough, press the foot or hand firmly into the ink. Hold it there while to lightly press all areas of the hand or foot, rolling a foot side to side slightly, to be sure you capture the entire print.
Step 3: Get the print onto the card.
For fingerprints, bring the card to the digit and TAP the digit onto the card surface. DO NOT ROLL the digit, just TAP. After the first print is on the card, move the card to make available a non-inked area and TAP the digit again. Continue this process until a good print is acquired. This may require re-inking. Never use lined paper for print-taking and DO NOT ROLL the digit. This may work on CSI but not for this purpose.
For hand and foot prints, similarly, do not press too hard or you may take away the edges of the print. Try a deliberate tap.
Step 4: Examine the prints that you’ve taken.
Review the prints taken before you clean off the ink from the digit. A good print shows clear ridges and good contrast. View the examples of prints below. Remember, if you don’t see detail in the prints, reprint. The quality of the keepsake is tied to the quality of the print.
For hands and feet, it may take you a couple tries. When you are happy with the print, then it is likely ready for your keepsake. Here you are not concerned about the texture, as with a fingerprint, but crisp edges that accurately define the print.
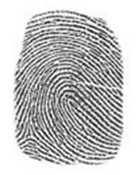
Good Print

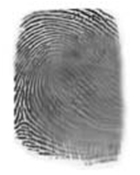
Light Print
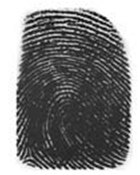
Smudged Print
Moist Print
Step 5: Scan your prints with a desktop scanner, OR take a clear photograph of them. Upload the scan or photograph with your order.
Instructions for scanning fingerprints, hand & footprints, and pet prints using a desktop scanner
- Use your desktop scanner to scan them as a Grayscale image, if available.
- For Fingerprints: Scan at 600 d.p.i.
- For Pet Prints or Hand and Foot Prints: Scan at 300 d.p.i.
- DO NOT resize. Use the crop tool; frame your selected prints near but not touching the print.
- Save the image in JPG format, as the name of the deceased or printed.
- When you are ready to place your order online at thumbies.com, you will be able to upload these prints to your order.